配列の取り扱い方
型 配列名 [ 要素の数 ]
例えば
int y[3] 3つの要素 ならば
y[0] y[1] y[2] 3つの入れ物が用意されます。
y[添字] 0から始まり、添字は配列の何番目の位置かを示します。
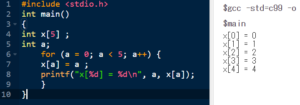
《 test033.c 》
#include <stdio.h>
int main()
{
int x[5] ;
int a;
    for (a = 0; a < 5; a++) {
    x[a] = a ;
    printf("x[%d] = %d\n", a, x[a]);
    }
}
結果
for 文で配列にデータを入力します。
《 test034.c 》
#include <stdio.h>
int main()
{
int x[5] = {7,9,1,2,4};
int a;
   for (a = 0; a < 5; a++) {
   printf("x[%d] = %d\n", a, x[a]);
}
}
結果

配列の初期化の場合
このデータを扱います。
| 1 | 2 | 3 | 4 |
| 6 | 7 | 8 | 9 |
| x[a][0] | x[a][1] | x[a][2] | x[a][3] | |
| x[0][b] | 1 | 2 | 3 | 4 |
| x[0][0] | x[0][1] | x[0][2] | x[0][3] | |
| x[1][b] | 6 | 7 | 8 | 9 |
| x[1][0] | x[1][1] | x[1][2] | x[1][3] |
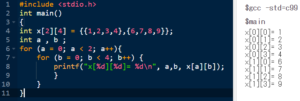
《 test035.c 》
#include <stdio.h>
int main()
{
int x[2][4] = {{1,2,3,4},{6,7,8,9}};
int a , b ;
    for (a = 0; a < 2; a++){
        for (b = 0; b < 4; b++) {
        printf("x[%d][%d]= %d\n", a,b, x[a][b]);
        }
    }
}
結果
int x[2][4] = {{1,2,3,4},{6,7,8,9}}; は2次元配列で初期化します。
構造体とは複数の変数・型を一つにまとめたもので、配列に近いイメージですが、構造体は異なる型や配列でも一つにまとめることができるます。
構造体を扱うためには、2つのステップが必要になります。
struct 構造体テンプレート名 {
型 変数名1;
型 変数名2;
型 変数名3;
};
② 構造体の宣言
データを記録するために、構造体テンプレートを持った変数を用意する
struct 構造体テンプレート名 構造体変数名;
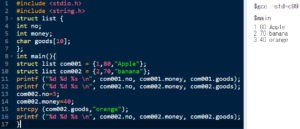
《 test036.c 》
#include <stdio.h>
#include <string.h>
struct list {
int no;
int money;
char goods[10];
};
int main(){
struct list com001 = {1,80,"Apple"};
struct list com002 = {2,70,"banana"};
printf ("%d %d %s \n",com001.no, com001.money, com001.goods);
printf ("%d %d %s \n", com002.no, com002.money, com002.goods);
com002.no=3;
com002.money=40;
strcpy (com002.goods,"orange");
printf ("%d %d %s \n", com002.no, com002.money, com002.goods);
}
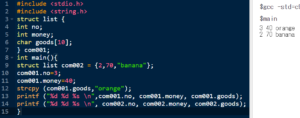
構造体テンプレートの構造体変数を同時に宣言
#include <stdio.h>
#include <string.h>
struct list {
int no;
int money;
char goods[10];
} com001;
int main(){
struct list com002 = {2,70,"banana"};
com001.no=3;
com001.money=40;
strcpy (com001.goods,"orange");
printf ("%d %d %s \n",com001.no, com001.money, com001.goods);
printf ("%d %d %s \n", com002.no, com002.money, com002.goods);
}
結果
構造体テンプレートの構造体変数を同時に宣言
7行目に 構造体変数名 に入れると同時に宣言が出来ます。
構造体とは複数の型を一つにまとめたもので、配列に近いイメージですが、構造体は異なる型や配列でも一つにまとめることができるます。
構造体を扱うためには、2つのステップが必要になります。
①構造体テンプレートの宣言
struct 構造体テンプレート名 {
型 変数名1;
型 変数名2;
型 変数名3;
};
② 構造体の宣言
データを記録するために、構造体テンプレートを持った変数を用意する
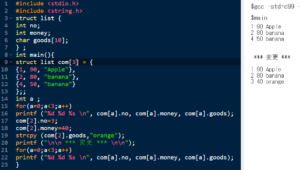
struct 構造体テンプレート名 構造体配列変数名[x];
《 test037.c 》
#include <stdio.h>
#include <string.h>
struct list {
int no;
int money;
char goods[10];
} ;
int main(){
struct list com[3] = {
{1, 90, "Apple"},
{2, 80, "banana"},
{4, 50, "banana"}
};;
int a ;
for(a=0;a<3;a++)
printf ("%d %d %s \n", com[a].no, com[a].money, com[a].goods);
com[2].no=3;
com[2].money=40;
strcpy (com[2].goods,"orange");
printf ("\n\n *** 変更 *** \n\n");
for(a=0;a<3;a++)
printf ("%d %d %s \n", com[a].no, com[a].money, com[a].goods);
}
